Project Development
Hi! My name is Kieron and this is the final blog for my CPDD Journey. 📹
*heaves a sigh full of mixed emotions*
In this page, I will:
1. Briefly describe my team's chemical device
2. Show how the team planned, allocated the tasks, and executed the project.
3. Document the entire design and build process of the chemical device and include videos, pictures, and screen captures of the processes.
4. Include a "Hero shot" of every milestone of the processes, for example; part A that was 3D printed, part B that was laser-cut, and electronics components moved/worked accordingly to the program.
The hero shot is taken with the person-in-charge holding/working/making the parts.
5. Include the name of the person who was in charge of every part of the project.
6. Document my individual contribution to this project.
7. Provide the link to the page of the blog of my teammates.
8. Describe problems encountered and how the team solved them.
9. Include all the project design files as downloadable files.
10. Embed the final prototype design file, i.e., the final fusion360 design file showing the entire prototype.
11. Type my Learning Reflection on the overall project development.
1. Our team's Chemical Device
- In this section, I will briefly describe my team's chemical device.
- What it is?
- What problems will the chemical device solve?
- Below is a hand sketch of the chemical device.
- Did you know that drinking a variety of tea provides benefits to the human body?
The benefits range from detoxification to promoting focus to being a healthy alternative to many drinks. Nonetheless, the key for all foods is in moderation. - Tea Steeping has also become an expensive hobby for some millennials in the current world, the video shown here is just an example of how interesting tea brewing can be!
- Albeit, the above-mentioned is the art of GongFu Tea brewing and was shared to showcase the interests and history of Tea Brewing.
- Nowadays, westernized tea brewing has become more straightforward.
- Brewing tea is a complicated art form that dates back to China more than 5,000 years ago and is performed through human functions
- However, for the amateur, it is difficult to get the perfect taste of tea to savor.

- Hence, to approach the ideal cup of tea for everyday folks like you and me to enjoy, we need a chemical device to aid us.
 |
| Western style of traditional tea preparation method |
 |
| Simple Functional Diagram |


+

 |
| Credits: Cheryl, 2023 |
2. Team Planning, allocation, and execution
- In this section, I will list down my team member's name and their respective roles (CEO, CFO, COO, CSO)
- I will show the finalized BOM (BILL OF MATERIALS) table.
- I will show the finalized Gantt Chart (planned and actual) and the task allocation for each team member.


Additionally, it allows a team to schedule and plan for projects, and track the progress of individual tasks, if done right.
It is important for project managers.

- I will research and design a code that programs the function to read temperature with the Temperature Sensor.
- Ruba will research and design a code that incorporates the function of the Servo Motor as well as a melody tune as a means for an alarm.
- We will then work together to compile the codes together into a single desired function for how we want the tea maker to work.


- Cheryl will spearhead the preparation of laser-cutting files via Fusion360 guided by the desired specifications as well as the operation of the laser-cutting machine.
- Cheryl will be in charge of assembling and collecting the fresh acrylic parts for the team.
- Hong Yi will design the functional CADD Model for the 3D Representation of our concept design
- Hong Yi will also design and 3D Print working parts for our prototype.
- Mainly the Lever working mechanism and a Hook piece to go along with it
3. Design and Build Process
Part 1. Design and Build of CADD and 3D Printing (done by Hong Yi)
Part 2. Design and Build of Tea Maker Parts via Laser Cutting
(done by Cheryl)
Part 3. Programming and Build of Temperature Sensor Circuit
(done by Me, Kieron)
Then I went to Youtube, Google, as well as past year project blogs to search for how to code the DS18B20 temperature sensor for Arduino.
- Create and Test basic temperature sensor code
- Learn and understand how the code works and establishes a connection with the serial monitor
- Compile my code with Ruba's code
- Finalise the system integration
- Head to Arduino Library Manager > Search for "Dallas Temperature" > Download Dallas Temperature by Miles Burton > Download all relevant libraries accompanied with it; you should have <Onewire.h> and <DallasTemperature.h>.
- These libraries will be necessary for the Arduino to look into to refer to knowledge and information libraries required for the temperature sensor to function.
- The libraries provide the Arduino with information relevant to temperature calculations and conversions, among others.
// Include the libraries we need
#include <OneWire.h>
#include <DallasTemperature.h>
// Data wire is plugged into port 2 on the Arduino
#define ONE_WIRE_BUS 2
// Setup a oneWire instance to communicate with any OneWire devices (not just Maxim/Dallas temperature ICs)
OneWire oneWire(ONE_WIRE_BUS);
// Pass our oneWire reference to Dallas Temperature.
DallasTemperature sensors(&oneWire);
/*
* The setup function. We only start the sensors here
*/
void setup(void)
{
// start serial port
Serial.begin(9600);
Serial.println("Dallas Temperature IC Control Library Demo");
// Start up the library
sensors.begin();
}
/*
* Main function, get and show the temperature
*/
void loop(void)
{
// call sensors.requestTemperatures() to issue a global temperature
// request to all devices on the bus
Serial.print("Requesting temperatures...");
sensors.requestTemperatures(); // Send the command to get temperatures
Serial.println("DONE");
// After we got the temperatures, we can print them here.
// We use the function ByIndex, and as an example get the temperature from the first sensor only.
float tempC = sensors.getTempCByIndex(0);
// Check if reading was successful
if(tempC != DEVICE_DISCONNECTED_C)
{
Serial.print("Temperature for the device 1 (index 0) is: ");
Serial.println(tempC);
}
else
{
Serial.println("Error: Could not read temperature data");
}
}
 |
| Temperature Sensor Circuit |
I felt overjoyed to celebrate my mini milestone and updated Ruba on my progress.
 |
| Work in progress... |
 |
| This was what we came up with |
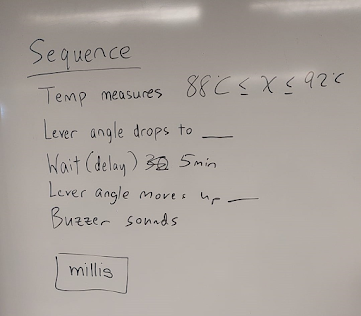
Something we could have tried was the "millis" function, which may have solved problems that arose later on, however, we decided not to, after learning that we first did not need it, and secondly, I felt that it was rather difficult, even after watching an hour-long worth of video lectures on the millis function.
 |
| I may be wrong, but it is this component, that even the Uno Maker has, but in a smaller form |
Back to the prototyping code...
For the subsequent days of the week after the consult, we agreed that Ruba will take the electronics to try and compile the codes to work on.
- Firstly, she did not include the relevant <DallasTemperature> files, which I added subsequently.
- Second, she used <int angle = 0> to store the servo angle position, which the computer may not have understood due to the library resources.
- Instead, you can use <int pos = 0> to introduce and store the servo position instead.

- From what I understand, the computer can read the servo.h library and convert voltages into angles automatically when the library is added.

- Lastly, she used the wrong variable name to label the temperature variable.
- The proper variable which took me a long time to find was <sensors.getTempCByIndex(0)> to display the temperature range that you want the computer to perform the "IF" Statement.
- Example, <if ((getTempCByIndex(0) >= 70 && (getTempCByIndex(0) <= 92)), followed by the desired code that you want the computer to perform after the "IF" Statement.
- I did not understand why I could not get the answer from previous blogs as even they used <temperature>
#include <Arduino_BuiltIn.h>
#include "pitches.h"
#include <Servo.h>
#include <OneWire.h>
#include <DallasTemperature.h>
//include all relevant library resources that we need; music notes, servo control, temperature probe DS18B20 pre-made libraries
Servo myservo; //include servo motor to be controlled
int pos = 0; //introduce variable position to store myservo position
#define ONE_WIRE_BUS 2
// Data wire is plugged into port 2 on the Arduino, Input is the Temperature sensor DS18B20
// Setup a oneWire instance to communicate with any OneWire devices (not just Maxim/Dallas temperature ICs)
OneWire oneWire(ONE_WIRE_BUS);
// Pass our oneWire reference to Dallas Temperature.
DallasTemperature sensors(&oneWire);
// arrays to hold device address
DeviceAddress insideThermometer;
// notes in the melody:
int melody[] = {
NOTE_C4, NOTE_G3, NOTE_G3, NOTE_A3, NOTE_G3, NOTE_B3, NOTE_C4
};
// note durations: 4 = quarter note, 8 = eighth note, etc.:
int noteDurations[] = {
4, 8, 8, 4, 4, 4, 4, 4
};
void setup() {
// put your setup code here, to run once:
Serial.begin(9600); //establish serial connection
Serial.println("Dallas Temperature IC Control Library Demo"); //print new readings on a subsequent string
sensors.begin(); //establish connection from the DS18B20 Temperature Sensor library with the board
myservo.attach(9); //attaches servo connection to pin 9, output is servo motor
for (int thisNote = 0; thisNote <10; thisNote++){
int noteDuration = 1000 / noteDurations[thisNote];
int pauseBetweenNotes = noteDuration * 1.30;
delay(pauseBetweenNotes);
noTone(8);
}
}
void loop()
{
//1: Code strings required for the temperature probe input are written
// call sensors.requestTemperatures() to issue a global temperature
// request to all devices on the bus
Serial.print(" Requesting temperatures...");
sensors.requestTemperatures(); // Send the command to get temperature readings
Serial.println("DONE");
/********************************************************************/
Serial.print("Temperature is: ");
Serial.print(sensors.getTempCByIndex(0)); // Why "byIndex"?
// You can have more than one DS18B20 on the same bus.
// 0 refers to the first IC on the wire
if (sensors.getTempCByIndex(0) >= 60 && sensors.getTempCByIndex(0) <= 85) //If statement () is true, perform the code mentioned below
{
{
// only operate between set temp range
for (pos = 150; pos >= 50; pos -= 1) { // goes from 150 degrees to 50 degrees in increments of 1 degree
myservo.write(pos);// tell servo to go to position in variable 'pos'
delay(100);
}
for (pos = 50; pos >= 50; pos = 1) { // maintain servo position at 50
myservo.write(pos); // tell servo to go to position in variable 'pos'
delay(3000); // waits 3mins before repeating the loop
}
for (pos = 50; pos >= 150; pos +=1) // goes from 50 degrees back to 150 degrees in increments of 1 degree
{
myservo.write(pos); //tell servo to go to this position
delay (10000);// delay ensures that the servo motor moves in a steady speed instead of moving instantaneously
for (int thisNote = 0; thisNote <10; thisNote++){
int noteDuration = 1000 / noteDurations[thisNote];
int pauseBetweenNotes = noteDuration * 1.30;
delay(pauseBetweenNotes);
noTone(8);
}
}
}
}
else //if statement in () is false, perform this code
{
myservo.write(150);//maintain servo motor position at 150 degrees
}
}
We wanted the code to loop only once and end with the Lever in the upright 120-degree position.

Through this, I have strengthened my coding skills, while also learning how to assemble simple circuits, and troubleshoot my Arduino code, circuit, and the importance of nurturing patience.
This is the link to the final functional code:
 |
| Vintage pictures of chemical engineering students doing Arduino Programming, 2023 |

Part 4. Programming of the servo motor and melody tune, as well as perfecting the code (done by Ruba)
Part 5. Integrating all the parts and electronics (done by everyone)
 |
| Marvel's Thanos reference |
Acrylic Gluing
For precision, we used a set square found in the lab to ensure a perpendicular fit for the parts.


After we assembled the base and pillar casing, we arranged and placed the Arduino Board and Breadboard neatly into the base to enclose and protect the electronic parts.
1. For cable management: Cable ties were used
2. For parts to stay attached to the base: Double-sided tape was used
3. For the base to stay attached to the pillar segment while being free to disassemble the parts to make changes, we implemented a cost-effective solution: Velcro was glued to the top of the base and bottom of the pillar to secure the parts together as a whole and allow for disassembly.
4. For the acrylic to withstand the heat of the cup and support the cup nicely: A coaster was used

Velcro

Cable management

1. For cable management: Cable ties were used
2. For parts to stay attached to the base: Double-sided tape was used
|
| Velcro |

 |
| Coaster |
Fusion360 Design
The Fusion360 Design provides accurate and specific measurements for our final prototype.
Demonstration of our Tea Maker in Action
360 View of the Prototype

4. Problems and Solutions
In this section, I will describe the problems encountered in the design and build process, and how the team solved them.1st problem: Integration of 2 separate codes
Like oil and water, the 2 codes just simply refused to work together when placed together. However, worked fine on their own.
Solution: The team consulted our lecturer, Dr. Noel, to seek advice on how to move forward.He advised us to come up with a sequence of step-by-step commands that we wanted Arduino to perform first. (Start Simple)
We then went home to research and work to compile the codes together. This simple task in fact worked! We managed to compile the basic codes together. Hence, always start your process simple.
We then went home to research and work to compile the codes together. This simple task in fact worked! We managed to compile the basic codes together. Hence, always start your process simple.
2nd problem: Lever was loose and would lose its rigidity after a few runs with the servo motor
 |
| A fraction of Hong Yi's 3D Printed Levers |
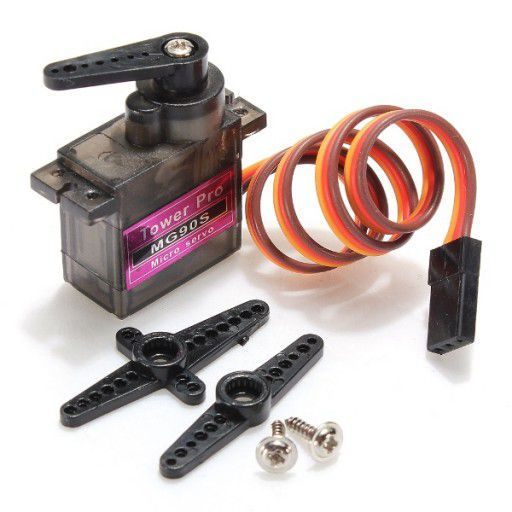
- Initially, the team consulted Dr Noel and he recommended using a metal gear servo that had more torque and was more rigid. He even passed a previous year's project mechanism to us for reference.
Final Servo Motor: https://sg.cytron.io/c-motor-and-motor-driver/c-dc-motor/c-servo-motor/p-mg90s-metal-gear-micro-servo

3rd problem: Servo jolted up when the code ended and was inconsistentBeing naturally sensitive and sudden like a mimosa plant, the servo motor would make minor jolts. This was normal.
The servo naturally is meant to be rotated consistently non-stop. However, we added a code that will make it stay at 120 degrees angle.
What was not normal was that the servo motor jolted back up immediately after our delay function timer ended. This was unfavorable as it would splash the tea around.
We later discovered after Ruba dissected the code, that the parentheses were not adequately placed.
Solution:
Add appropriate brackets (), {} and remember to check through every section of the code to ensure it is ok.
Just because the compiler allows the code a "Green light", does not mean that the code will do what you want it to do.
Add appropriate brackets (), {} and remember to check through every section of the code to ensure it is ok.
4th and Last Problem: The code played continuously and the servo kept moving back down towards the teacup.
This was because the input Temperature was still above the IF condition, hence the output of the Servo Motor would still acknowledge and repeat the IF Loop.
Solution:Researched and placed code strings that makes the code void loop() play only once. 


From this list of problems and solutions, what can we conclude?Although all the components are equally challenging to attempt, the coding gave rise to a myriad of problems.
From my experience and journey, I conclude that this could have been due to my skill level in attempting Arduino coding, and miscommunication, as well as the other teammates, were stronger in the other aspects of the prototype designing.
I do blame myself, but understand that programming is not a main feature of what I am learning and an assistance skill to have. By slowing down and learning this new skill, I improve at it.
In a body, various systems come together to ensure the body survives. Without each other, the human system will fail.
Similarly, a team comes together to ensure the success of the project. Every member is crucial and plays an important role. Some may be stronger and some may be weaker, but everyone is equally important.
I recall the Critical Path Method taught during Prototyping Lesson.  The success of the prototype project was held captive by the Arduino code taking such a long time to develop. In the future, I can use this analysis to weigh the importance of each task and aim to be productive and efficient in handling the problems that arise by settling the most critical task first.
In our team, we did try that, which was why we left much of the acrylic gluing and accessories to the last week of prototyping.
In our team, we did try that, which was why we left much of the acrylic gluing and accessories to the last week of prototyping.
5. Project Design Files as Downloadable Files
Here is the link to the google drive: https://drive.google.com/drive/folders/1eQMfqpbbop8s4fjV94Td3T_cYyNmWEU6
- Arduino IDE codes for Tea Maker (.docs)
- For the code, we had trouble compiling them into a single downloadable file.
- Open up Arduino IDE > Paste the first document file > Open new tab > Paste the second document file
- Ensure that the <DallasTemperature> and relevant additional <OneWire> Libraries have been added to the app, if not the compiler will not acknowledge them.
- This was mentioned earlier in Section 3 for my contribution to the project.
6. Below is my Learning Reflection on the overall Project Development
Transferrable Skills and a look back on my achievements
- I learned an important shortcut, cutting parts of pages. I came across this during my documentation journey.
- I learned that I love editing videos and take to the chance of any opportunity.
- I learned to capitalise on the skills and knowledge taught in previous modules or encounters.

- I managed to be a consultant for my friends from other teams who needed help with the laser cutter machine after learning how to operate it myself. Although there were complications, I managed to help them cut and engrave their files beautifully.


I consulted my friends from class 05 (Valarie, Asraf, and Jia Xin) who were more hands-on and good at Fusion360 and they gave me some verbal tips while hopping onto Thingiverse to try and find something similar.
Heading back home, I attempted to design a trial model and 3D Printed it during my free time while working on the CPDD Prototype.
Sadly, I have yet to complete a working prototype which is why I partially achieved this goal.
However, this came through at the expense of my team's trust in me being lost at some time in this journey and frustration.
 |
| Source for the base drawing: @happinessproject, Tiktok, 2023 |
