Laser Cutting

Hii! Today I will be sharing my documentation and experience on the laser cutting skill.
🔦 🔎❤️‍🔥

In this page, I will describe:
  1. The 4 important hazards associated to the operation of laser cutting machine and their respective safety control measures (administrative/engineering control).
  2. The materials that can be cut and can't be cut using laser cutting machine.
  3. The steps including pictures on the operation of UNIVERSAL laser cutter, that consist of:
    • Starting the compressor, turning on the laser cutter machine and fume extractor.
    • Importing a .DXF file to coreldraw and modify the lines/fill for cutting and engraving.
    • Sending the coreldraw drawing to laser cutter software and setting the laser cutter power, speed, PPI in the software.
    • Starting the job on the laser cutter machine.
    • DOs and DONTs when there's flame/fire on the material being cut.
  4. My Learning reflection on the laser cutter activities.
Before we go into the politics of the laser cutter machine, let me run us through some interesting knowledge about laser cutting. 👽

Here's a detailed look at the laser cutter on a diagram.

Based on this diagram, we can tell that the laser has to reflect its beam against a series of mirrors. Therefore, the mirrors should be clean to have a precise cut.

From this knowledge, we know now that a laser is essentially a magnifying glass that uses power from light.


Kerf
An important and interesting concept that was introduced in class.
Kerf is an allowance cut made by a manufacturing machine (e.g. laser cutter, 3D printer) that takes into account the width of the cut and cuts out slightly more than what is stated by the job.

This concept is important when designing objects such as Press-Fit structures.
Press-fits require a tight fit in order to be secured together. Hence, the user should allocate a slightly different dimension specification into the machine for a press-fit structure.
Examples of Press-fit structures

Vector VS Raster


Vector

Raster

Resolution

Scalable

Pixels

Photo for description


File Size

Small

Large

File Format

DXF, AI, SVG, EPS

BMP, GIF, JPG, PNG, TIFF

Elaboration

Vector graphics, aka Scalable vector graphics (SVG).


These graphics consist of anchored dots and connected by lines and curves, similar to the connect-the-dot activities some may have done in primary school.


Crafted from algorithms

Raster images are made of pixels, or tiny dots that use colour and tone to produce the image.


Pixels appear like little squares on graph paper when the image is zoomed in.


These images are created by digital cameras, by scanning images into a computer or with raster-based software.


A common example of Raster formats would be every time we screenshot a picture, it produces a Raster.


Below are the 4 important hazards and the respective safety control measures for the operation of the laser cutting machine.

No.

Hazards

Safety control measures

Pictures to support the explanation

1

Fumes and gas accumulated within the laser cutter system can result in chemical hazard

Fume extractor in place to remove noxious smoke and gases from the system

2

Residue smoke and debris left on workspace gives rise to fire hazard 

Air compressor is used to blow smoke and debris away from the laser head

3

Materials may catch on fire during job

Fire extinguisher on-site to eradicate large uncontrollable fires

4

Continuation of the laser beam while lid door is opened poses a physical hazard for users, such as burn or cut injuries while laser is active

Interlock feature denies laser from being activated while lid is open


These are the materials that can be cut/engraved using laser cutting machine in FabLab.
👌🙆🆗㊣


No.

Material

Photo of material

1

Wood

  • Plywood (layered)

  • Natural wood (e.g. Cedar, Pine)

2

Acrylic (up to 5mm)

  • Ensure to remove paper adhesive on the side that is being exposed to laser head (adhesive is flammable)

3

Cardboard

  • Burnt marks or fire may occur

  • Should monitor especially closely

4

Paper

  • Art Card

  • Technical Board


These are the materials that can’t be cut/engraved using laser cutting machine in FabLab
🙈🙅🚫🔞 (Banned)


No.

Material

Photo of material

1

MDF Wood

  • Burnt marks may occur

  • Toxic bloom which is noxious may be produced and evaporates into the air

2

Contains Chlorine or Foam

  • E.g. PVC Plastic

  • Chlorine gas which is toxic will develop

3

Metal

  •  Has strong reflective properties which may cause laser beam rejection


Below are the steps on operation of UNIVERSAL Laser Cutter machine in FabLab:

    a) Starting the compressor, turning on the laser cutting machine and fume extractor.

  • Once you enter the room, start up the laser cutter machine by turning on all these switches

No.

Steps and description

Photos to support the description

1

2

Starting the compressor (Air Assist)

Starting up Laser Cutter machine


  • Switches of laser cutter machine are located behind the computer screen

  • Turn all the plugged-in switches on and double-check to ensure they are switched on


3

Turning on Fume extractor


  • Switches are labelled

  • At the far left corner to the laser cutter machine, look for the switch labelled “Fume Extractor” and turn it on


    b) Importing a .DXF file to CorelDraw and modify the lines/fill for cutting and engraving.
  • Head over to the PC Monitor and go to the CorelDraw application

  • We will be using largely .dxf files since they are convenient and applicable to the Fusion360 application that we have been taught on

No.

Steps and description

Photos to support the description

1

Import E-file


  • On extreme top left corner, 

  • Select File function > from dropdown menu, select Import > Select desired .DXF File > Press Import


2

Modify functions to meet desired laser cutting objective (Vector cut/Scoring)

  • There are 3 things to check for in the CorelDraw application before sending the job

  • Fill Colour

  • Pen outline colour

  • Line width


Vector Cut

Fill Colour: None

Pen outline colour: RGB RED (255)

Line Width: Hairline


Vector Engrave/Scoring

Fill Colour: None

Pen outline colour: RGB GREEN (255)

Line Width: Hairline


*Nonetheless, in the event that one has forgotten the tools to change for each job, one can simply refer to the laminated card just below the computer’s monitor for the functions to change.*


Double-click on the functions to make changes

Box with red dash 

- Fill Colour

Black Box with pen next to it

 - Pen outline colour and line width

From the Color dropdown menu,

Depending on the function, Set R or G to be 255 and the other colour variables to be 0.

   
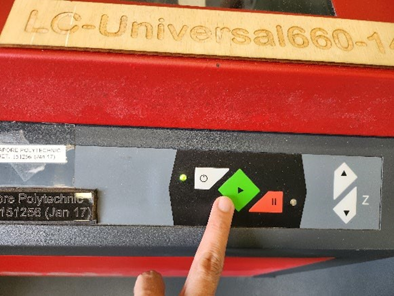
 c) Sending the CorelDraw drawing to laser cutter software and setting the laser cutter power, speed, PPI in the software.

No.

Steps and description

Photos to support the description

1

Send to Print

  • Click on File > dropdown menu > Print > Click on Cogwheel, for software settings ⚙️

  • Click on LOAD for additional material settings

  • Select the file presets that matches the material type and thickness, then select OPEN

  • Once done with Settings, CLICK “OK”

  • Click on PRINT, to send job to UCP


*Just check, if anything is meant to be highlighted RED/GREEN (cut/engrave), MODE on the left should be either RASTER/VECTOR, not SKIP*


2

Setting laser cutter software (Power, Speed, PPI)


Quick Guide

Power: Higher power for Tougher materials, Lower power for Weaker materials

Speed: How fast the laser head moves

PPI: Sensitivity of the laser, how many times the laser pulses over a given distance


  • On the PC bottom’s taskbar, open the UCP

(Universal Control Panel) application

  • Using the Move tool, move the object to an empty space on the plywood 

(Concentration of laser will be on the left zones of the workspace)

  • With the lid still open, click on the FOCUS tool, and a crosshair will appear 

(check if the file is within the safe cutting area borders of the plywood)

  • Click as close as possible to the extreme bottom right corner of the file, moving the laser head to the point, remember to check multiple points as necessary to ensure that file is within safe area before starting the job

  • Click on EST TIME tool and click START button to check for the timing

  1. Zoom

  2. Focus (Laser Head)

  3. Move (Object)

  4. Estimated Time


*Combine usage of tools 2 and 3 to find an accommodative spot to begin the cut*


To Check that file is within safe cutting area:

Cross-check both the ruler measurements on physical space and on the UCP


d) Starting the job on the laser cutter machine.

Steps and description

Photos to support the description

If all is good,

  • Shut the lid gently

  • Press either the PLAY button on UCP or the Physical button on the Laser cutter


Navigation of the UCP

  1. Activate/Deactivate the LaserCutter (Power)

  2. Play Button to begin the Cut/Engraving

  3. Pause Button to pause/resume the Cut/Engraving

  4. Essential tools (refer to below)


e) DOs and DONTs when there’s flame/fire on the material being cut. (SAFETY)

DOs and DONTs

Photos to support the description

Any flame MUST DIE OUT within 1-2 seconds. If the flame persists, lift the lid of the laser cutter and stop cutting operation.


If the fire is negligible, try putting it out by blowing it off


If the fire is unable to blow off,

  1. Remove material from laser cutter

  2. Place material on floor and step on it to put out the fire


If the fire is truly uncontrollable, go to the closest fire extinguisher and put it out. 


Get the attention of other’s by shouting for help.


f) Housekeeping

Once done, 
  1. Remove any unwanted materials and dispose/recycle them
  2. DEACTIVATE the Laser Cutter
  3. Switch off all the necessary switches, as well as those that you turned on when you entered
  4. You need not shut down the PC
The idea is to leave the room cleaner or as clean as it was before you used the room.

Learning Reflection

Overall, this activity was truly a new, fun and interesting experience. From this Laser Cutting Certification practical, I have learned a new skill of subtractive manufacturing; laser cutting.

From this practical, I have learned that some things may appear difficult on the surface, however with confidence in my own ability and preparation, what was once a scary thought simply dissipated.

After the safety briefing and quick revision done by Mr Mark, he decided to volunteer someone to go first. Initially, I was afraid to be the first, however, I looked at Mr Mark and he looked at me. Hence, I saw myself going first. Especially when the rest of my classmates were less courageous.

During the competency test, a good tip I learned for doing any task in front of a mentor or a tough task in general, would be to talk while you are doing the procedures.

What do I mean by this? I mean to say what you are about to do next before you begin.
For example, "I turn on the air compressor switch behind the PC monitor", when silence is heard, carry out the activity, knowing full well that the silence = approval.

This skill even applies to my Process Operation Skills 2 Practical. Before doing anything on the Distributed Control Systems (DCS), a good practice will be to voice out what I will adjust before I adjust the variable.

Well, ultimately, going first in anything does not have any negative impact on you.
You will not be nervously affected by the performance of others since you have already completed your job.

I came out with my finished product proud and happy, while also setting an example for my classmates to not be afraid and go with the flow.

My finished product made from Plywood

Laser Cutting, although may give rise to more waste material than say 3D Printing, it is a very convenient and efficient method of creating complex structures.


My finished keyring product took roughly 5-10 seconds to complete, however, a 3D-printed keyring would take upwards of 10 minutes to complete. Hence, there is still demand for Laser Cutting.

Finally, I have also noted from the sample products that Dr Noel brought to class, that Acrylic material is rather fragile😜🤭

I managed to chip off a part of the connector for an elephant figure while trying to piece together the structure


Well, that is a wrap for my Laser Cutting workshop experience. See you soon!!

Popular Posts

Image

About me